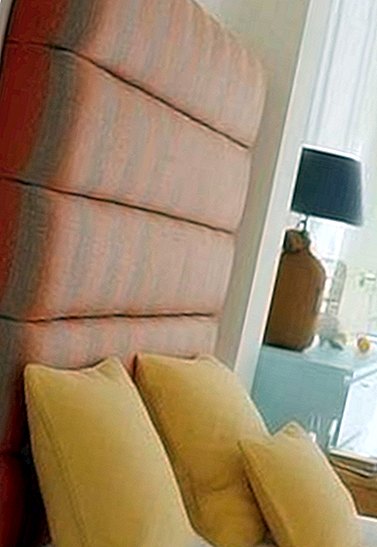
Instructions: Bed head in Marseille style
Draft: Peter Fehrentz Implementation: expert Time spent: approx. 2 days All dimensions in centimeters.

Tool: Ruler, spirit level, cordless screwdriver, hammer, drill, wood drill, screw clamp, joiner's angle, jigsaw or circular saw, pencil, scissors, stapler with staples, pliers, trestles, sewing machine, iron, tailor's chalk
Material: - Sewing thread - 8 pcs. Screws 3.5 x 40 mm - 3 pcs. Screw hooks and dowels - Spray adhesive for foam
cutting: - 1 chipboard (19 mm) 160 x 140 cm - 2 wooden strips 140 x 4 x 3 cm - 2 wooden strips 154 x 4 x 3 cm - 1 wooden strip 134 x 2 x 2 cm - foam in back quality, thickness = 20 cm 1 strip 142 x 40 cm 5 strips 142 x 24 cm - polyester wadding, thickness = 2 cm 1 strip 166 x 40 cm 5 strips 166 x 32 cm - fabric 650 x 142 cm
Note: The bed head should always be the same width as the bed. In this case, we chose a bed 1.40 m wide.
Step by step to the bed head:
1. On the back of the chipboard, screw the 4 wooden strips flush with the outer edge. Pre-drill the holes with a wood drill.

2. The small strip is now screwed to the lower edge of the upper strip, creating a 1 cm wide groove (see Fig. 1). This will later be used to hang the plate on the wall.
3. Now trim the fabric for the cover of the bed head. The cut dimensions (calculated with 1 cm seam allowance each) are 142 x 442 cm for the front of the bed head and 25 x 442 cm for the two side strips (see Fig. 2).
4. Mark the fabric from the back with a tailor's chalk with horizontal lines and the respective center and sew the strips right and left (see Fig. 3).

5. Now place the fabric right-to-right along the recorded lines. Iron this edge as a sewing aid. Sew along the edge now 2 cm. Proceed in this way with all lines.
6. Next, draw on the front of the chipboard with a pencil lay-up lines (See Fig. 4).

These will help you later when sticking the foam and when tacking the seam flags from the cover.
7. Now take a narrow strip of foam and fix it with some supernatant on both sides and at the upper edge along the upper line with spray glue. Stick the polyester cotton onto the foam so that it reaches the sides and top of the wood.
8. The top seam tab is placed underneath the fixed foam strip on the uppermost lay line and stapled from the center.
9. Now the next strip of foam follows, which you fix on the plate and stick with the cotton wool. Place the next segment of the fabric over the foam, align the seam banner at the center point again and staple it as described above. Proceed in the same way with the four other foam strips.
10. Now the fabric has to be fixed to the back of the chipboard. Pull the fabric evenly around the edges at the top and on both sides from the center and staple it on the back. Smooth the fabric folds protruding from the sides and stuff them between the segments.
11. The finished bed head is finally mounted on the wall. At the height of 154 cm, drill three holes at a distance of 60 cm into the wall. Insert the dowels and tighten the screw hooks so that they look out about 3 cm from the wall. Now you can hang the bed head.


